
Sharing files outside your organization
Sometimes, you need to share important files with people who are not part of your organization. While some people use email to do this, it's not always the safest option. Sending files as email attachments can come with several risks.
That's where Microsoft SharePoint comes in. Whether you're sharing files with customers, partners, vendors, or even other departments, SharePoint allows you to send files securely. In this guide, we will show you how to effectively use SharePoint file sharing outside of your organization.
Setting permissions
SharePoint administrators have the ability to control external file sharing settings, ensuring enhanced security and oversight. For example,
- Which users have access
- User permissions
- Whether or not to track user activities
They also possess the capability to establish expiration dates, thereby controlling how long external users retain access to particular files before it is revoked.
Two ways to share files
Using the "Share" button.
With the "Share" button, you can send the file, to one or more people.
Sending a link.
Use this option when the file is too large, or if you want multiple people to have access to the file easily. For example, share a link to a file in a Microsoft Teams group chat.
These options are illustrated below.
File sharing steps
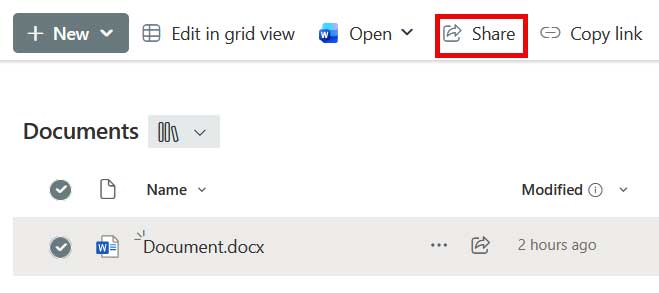
1. In SharePoint, select the file you would like to share.
2. With the file selected, Click on the "Share" option located in the top command bar.
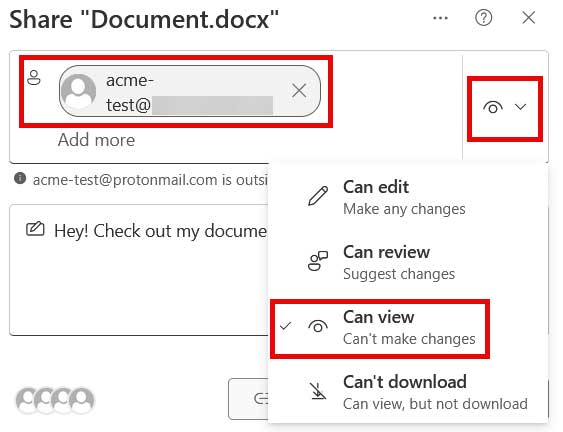
3. Type in the email of the person you would like to share the file with. To change their permissions, click on the drop-down that is to the right of the email.
"Can view" is usually the default permission when sending outside of an organization.
Adding a message is optional.
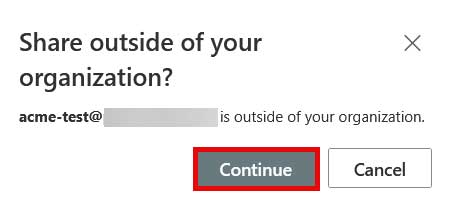
4. If the "Share outside of your organization" pop-up appears, click "Continue."
5. The final setup should look similar to the image on the right.
6. Click "Send."
To share the file using a link, you would click "Copy link", and then paste the link into an email or a chat message.
You have now successfully sent a file to someone outside of the organization.

What the recipient sees
After the file has been shared via the "Share" button, the recipient will receive the message to the right in their inbox.
The recipient has to click "Open" in order to view the file.
Microsoft will then authenticate the recipient before they can access the document.

Wrap up
You now have the key to effectively share files using SharePoint, one of the most secure platforms available, equipped with robust security measures to ensure your files remain protected. Safeguard the integrity of your documents by sharing them securely with the appropriate recipients.
Should you encounter any challenges during the process, you can reach out to Microsoft 365 Support for assistance. Better yet, sign up for a Computer & Network Support Plan from Information Results and have our experts at your side!